A better noise gate
Published on
A noise gate is a type of sound effect. It detects the parts of the audio signal with very low volume, where nothing is happening apart from the background noise, and either reduces the volume further or silences it completely. It doesn’t remove the noise from under the speech—that’s called noise reduction—but it removes the noise between the phrases.
Back when audio processing was analog and real-time, the noise gate had to be simple. It would notice when audio went either above or below the threshold, and “open” or “close” the gate correspondingly. When the gate is closed, the output is suppressed to remove the noise; when the gate is open, the input goes to the output unchanged. To soften the transition, the gate doesn’t open/close immediately but goes through the attack and decay phases, spread across a short amount of time, like 50ms.
The de-facto standard noise gate plugin for audacity, noisegate.ny, does a pretty good job emulating an analog noise gate but also doesn’t do much beyond that. There are two major drawbacks of that plugin, which I can summarize as:
- Sometimes it doesn’t reduce enough
- Sometimes it reduces too much
So I implemented my own noise gate plugin that addresses these issues—and it is also much faster. But before I get into that, let me explain in more detail the ways in which the usual noise gate plugins fall short.
Not enough reduction
A typical noise gate (including noisegate.ny) closes when the loudness (or, more precisely, the amplitude) of the signal falls below a specified threshold. Once the amplitude exceeds the threshold, the gate opens. Therefore, a single loud click, even a very short one, can open the gate.
Therefore, a single run of the noise gate is often not enough to get rid of all the noise. You would need then to go and manually remove the remaining patches of noise and clicks, or to run a second (and sometimes third) noise gate with different parameters.
Too much reduction
So why not just raise the threshold to cover the peaks as well? That’s the second issue with the usual noise gates. Near the beginning or the end of a phrase, the sound is usually softer and may not be enough to open the gate. This results in a characteristic loss of syllables. For example, here’s a short clip from The Effort Report podcast.
And here’s the same clip after applying a noise gate with threshold=-47dB, level reduction=-50dB, and attack/decay=50ms.
In the original clip, the “f” sound in “off” can barely be heard, but the brain still registers it. After the noise gate, it’s lost completely, and the phrase sounds unnatural: make sure you’ve got your ringer turned o’.
There are a few strategies to fight this annoying effect:
- lower the threshold, e.g. -55dB instead of -47dB.
- increase the attack/decay, e.g. 500ms instead of 50ms.
- lower the reduction level, e.g. -10dB instead of -50dB.
In the past, I used a combination of these tricks and several runs of the noise gate to get rid of all the noise while trying not to damage the speech. It worked but took a lot of time.
To be fair, there are noise gates implementation that, in addition to attack and decay, also have a sustain phase—but noisegate.ny is not one of them.
A better noise gate
In addition to the traditional Threshold and Attack/decay parameters, my noise gate has two new parameters: window size and the minimum amount of non-silent audio per window.
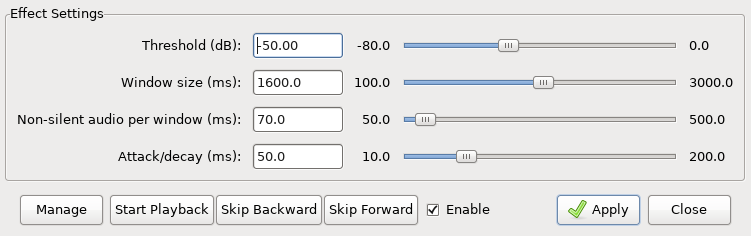
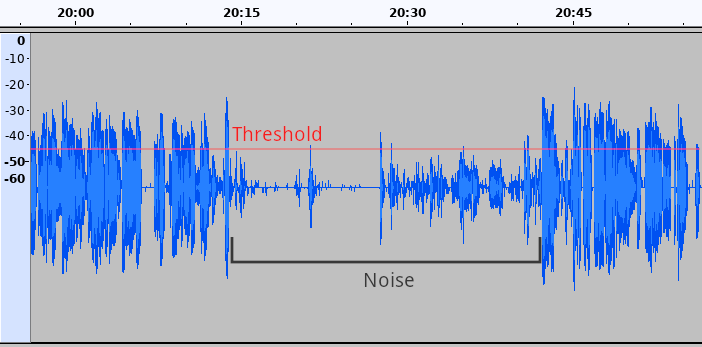
At each time point, the noise gate makes the decision whether to silence it or not. To make the decision, we consider a symmetric window around the current time point, and whose width, in milliseconds, is given by the user (the second parameters on the screenshot above). Then we calculate the amount of non-silent audio, in milliseconds, present within this window. The non-silent audio is defined as audio whose amplitude exceeds the threshold (the first parameter on the screenshot). If the amount of non-silent audio exceeds the critical duration (the third parameter), then the current audio sample is not silenced. Otherwise, i.e. if most audio in the vicinity of the current time point falls below the threshold, the current sample is silenced.
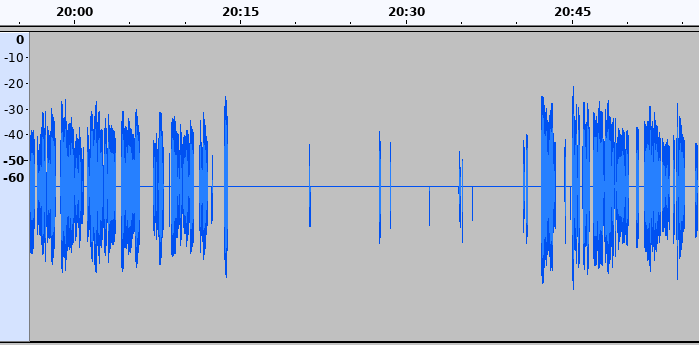
So why is this algorithm a better noise gate? First, consider the case when the traditional noise gate doesn’t reduce enough. That happens when there’s a high-amplitude spike in the audio. These spikes or clicks tend to be very short, and if they are surrounded by low-volume noise, then in their window there won’t be enough non-silence to open the gate.
Next, consider the case when the traditional noise gate reduces too much. This typically happens near at the boundaries between silence and non-silence. Therefore, even if the instanteneous volume is low, in the window around it there will be enough high-volume signal to keep the gate open.
Choosing the parameters
Here’s how I suggest to pick the right parameters for the noise gate.
- Set the threshold to the general noise floor level, ignoring the occasional spikes and clicks.
- Find one of the widest (i.e. longest) spikes/clicks that rise above the threshold. Measure the duration of the part that’s above the threshold and set the “Non-silent audio per window” slightly above that value. If there are several wide clicks next to each other, add their widths together.
- Given the threshold you chose on step 1, think about how long the beginning or ending of a phrase can be that falls below the threshold. Let’s say it’s 600ms. To get the window size, add that duration to the value of parameter #3 (non-silent audio per window) and double it. For instance, let’s say you chose 150ms on step 2. Then your window size will be 2×(600ms+150ms)=1500ms.
- The attack/decay choice is subjective. I usually pick 50ms. It shouldn’t matter much because by the time the gate closes (assuming you picked the good values for the other parameters), any speech should be over, and we are only dealing with noise at this point. This is in contrast to the standard noise gates, where attack/decay may cover quieter parts of the speech.
Also, if you use a noise gate (any noise gate!), make sure to run noise reduction first. When there’s a uniform noise behind the speech that suddenly disappears in between the phrases, it sounds very unprofessional.
LADSPA
My noise gate uses the plugin interface called LADSPA, which stands for Linux Audio Developer’s Simple Plugin API. This is different from most Audacity plugins, which use the Nyquist interface. The disadvantage of LADSPA is that you’ll have to compile the plugin for your platform. But there are quite a few advantages:
- It is very fast. I ran both my noise gate and Steve’s noisegate.ny on the same track, 1h19m41s in length. noigate.ny took 1 minute 18 seconds to finish; my noise gate took only 9 seconds.
- The progress bar in Audacity is accurate for LADSPA plugins. When I ran noisegate.ny, the progress bar reached 100% and stayed there at 30 seconds—by which time the plugin wasn’t even halfway done.
- It processes the track incrementally, so it consumes much less memory.
- In Audacity, there is a live preview for LADSPA plugins but not Nyquist plugins.
- It can work under a variety of audio editors and DAWs that support
the LADSPA interface (Audacity, Ardour, GNU Sound etc.), unlike Nyquist,
which, to my knowledge, is only integrated into Audacity (although there
exists a standalone Nyquist interpreter). There is even a command-line
program distributed with LADSPA,
applyplugin, that can apply a plugin to an audio file in batch mode, without any GUI.
Give it a try. The source and installation instructions are on GitHub: https://github.com/UnkindPartition/noise-gate.